A fun afternoon during spring break.
SAGE2 on the Raspberry Pi-3
A while back, I installed SAGE2 on my original Raspberry Pi (model B – 512 MB) but it was really to underpowered to run the full blown browser. The server side with NodeJs was no problem. I still use it as picture frame at home, flipping through pictures, but it takes several seconds to swap in a new picture (HD resolution).
Here’s a small time-lapse (accelerated) video of my Pi-1 at home used as a picture frame:
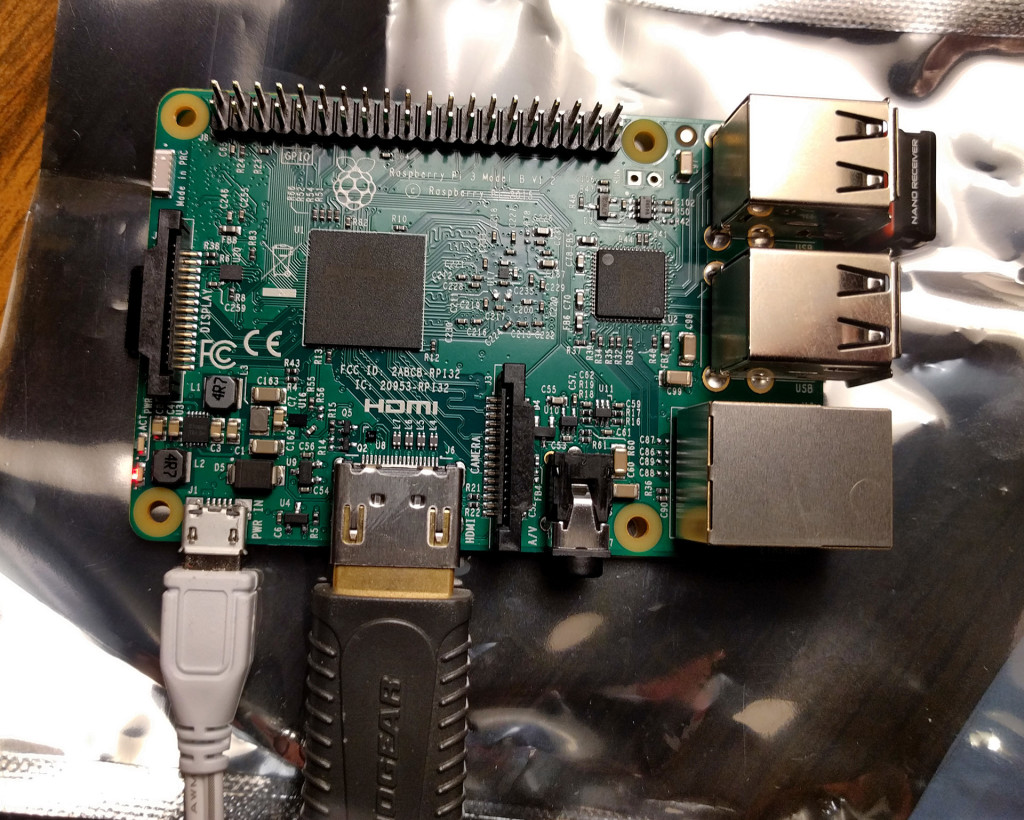
I now finally received my Raspberry Pi 3, much is much snappier than the original board, with 1GB of RAM and a multicore CPU. The GPU remains the same. The main attraction is also the builtin Wireless and Bluetooth chips. It makes the setup so much easier. I found the wireless flaky on my Pi-1.
This time, installing SAGE2 was a breeze (if you’re comfortable with using a command line).
Setup
- Download the latest Raspbian distribution (Raspbian Jessie, March 2016 – 2016-03-18) and burn it into a mico-sd card (I used a SanDisk Ultra 32GB microSDHC for $10). I forgot how small micro SD was. But 32GB should be plenty of space for lots of content.
- Burn it into a Micro-SD card (I used a SanDisk Ultra 32GB microSDHC for $10). I forgot how small micro SD was. But 32GB should be plenty of space for lots of content.
- Plug power and HDMI cables (I got the recommended new USB power supply, since in the past, we had issues with power when playing Pi+Camera combos).
- I use a Logitech wireless keyboard-mouse combo for convenience, with a little USB dongle. No driver, no setup.
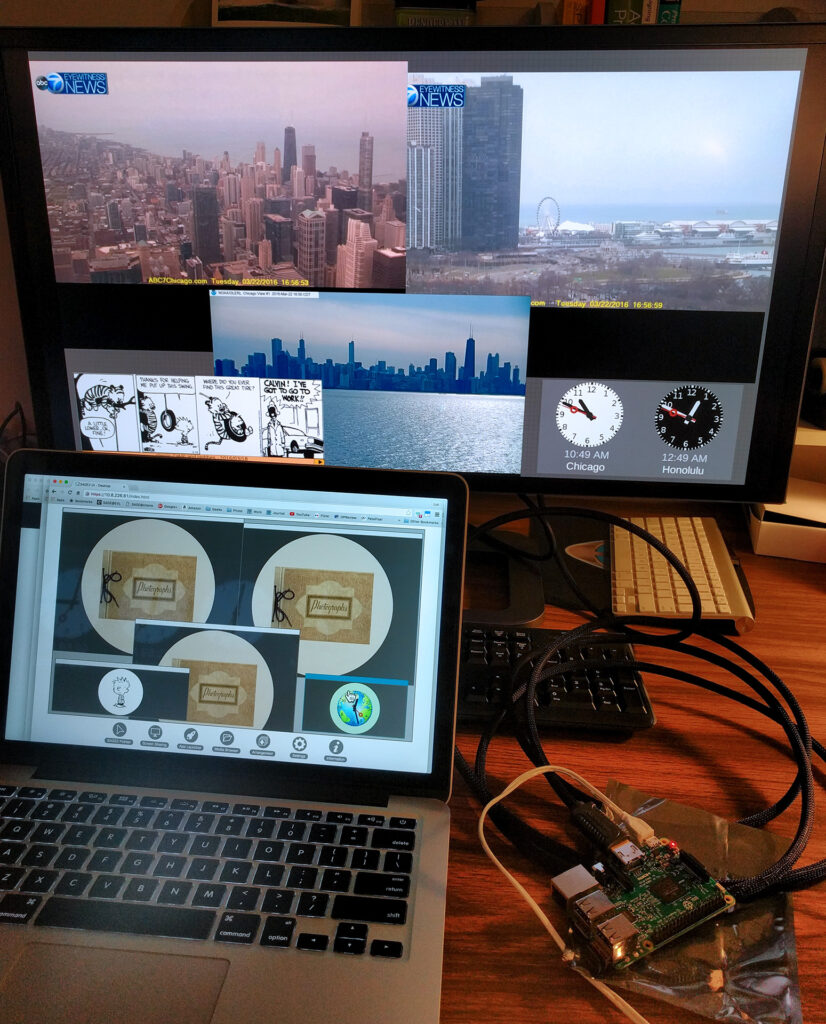
Here’s my Pi3 with just the power cable (white), the HDMI cable to a HD screen, and the logitech keyboard-mouse dongle on the side in one USB port:
Update the system
- Always, stay up to date with the OS
sudo apt-get updatesudo apt-get upgrade- https://www.raspberrypi.org/documentation/raspbian/updating.md
- Update the firmware
sudo rpi-update- Info: https://github.com/Hexxeh/rpi-update
- Tweak a few settings
sudo raspi-config- like password, extend file system to the full SD card, …
- https://www.raspberrypi.org/documentation/configuration/raspi-config.md
- Reboot and enjoy a tiny snappy computer
- make sure to setup wireless and have SSH running (it should be by default).
SAGE2 dependencies
NodeJS
- NodeJS: Download a binary version of NodeJS (it’s preinstalled but an old version)
- At this point, the OS is still ARMv7, since it’s running in 32bit. Eventually we will see a 64-bit release using ARMv8 since the Pi-3 is compatible.
- https://nodejs.org/en/download/stable/
- I used: https://nodejs.org/dist/v5.9.0/node-v5.9.0-linux-armv7l.tar.xz
- Just unpack and add the ‘bin’ folder to your PATH (or remember the path)
- Check if it works:
./bin/node -v./bin/npm -v
SAGE2 dependencies
- I didn’t bother with FFMPEG: the platform is a little underpowered to tun video in software (the omxplayer tool plays videos fine, using the Broadcom VideoCore hardware).
- Install ‘ghostscript’, ‘imagemagick’, ‘exiftool’, ‘setcap’, ‘nss3-tools’, … similar steps to an Ubuntu installation
sudo apt-get install ghostscript imagemagicksudo apt-get install libcap2-bin libnss3-toolssudo apt-get install libimage-exiftool-perl
- Make sure that NodeJS can access the privileged ports (80/443) as a regular user (don’t run SAGE2 as root)
setcap 'cap_net_bind_service=+ep' [path to node]/bin/node
Web browser
There are various browser available on the Raspberry Pi platform:
- Default: Epiphany, comes preinstalled, OK for basic web surfing, but cannot run SAGE2 display code (I didn’t investigate). However, it should run videos in hardware.
- A version of Firefox, called IceWeasel
- to install: sudo apt-get install iceweasel
- It runs SAGE2 fine
- The open-source version of the Chrome browser from Google, called Chromium:
- some users generously compile and provided fairly recent binaries
- See: https://www.raspberrypi.org/forums/viewtopic.php?t=121195
- wget https://dl.dropboxusercontent.com/u/87113035/chromium-browser-l10n_48.0.2564.82-0ubuntu0.15.04.1.1193_all.deb
- wget https://dl.dropboxusercontent.com/u/87113035/chromium-browser_48.0.2564.82-0ubuntu0.15.04.1.1193_armhf.deb
- wget https://dl.dropboxusercontent.com/u/87113035/chromium-codecs-ffmpeg-extra_48.0.2564.82-0ubuntu0.15.04.1.1193_armhf.deb
- sudo dpkg -i chromium-codecs-ffmpeg-extra48.0.2564.82-0ubuntu0.15.04.1.1193armhf.deb
- sudo dpkg -i chromium-browser-l10n48.0.2564.82-0ubuntu0.15.04.1.1193all.deb chromium-browser48.0.2564.82-0ubuntu0.15.04.1.1193armhf.deb
- Run with: chromium-browser
Since Chromium is an official release, it does not provide hardware rendering and video decoding. For me, it’s fine, I’m mostly interested to run fairly static 2D applications (digital signage, PDF, images, infovis applications using SVG, …). I use chromium here.
SAGE2
Source code
Get your copy of the SAGE2 source code:
- cd $HOME
- git clone –depth 1 https://bitbucket.org/sage2/sage2.git
- cd sage2
- cd keys && ./GO-linux && cd ..
- [path to node]/bin/npm install
- start the server
- [path to node]/bin/node server.js -l
Documentation
For more details, Refer to the SAGE2 installation documentation:
Running
Finally, you can get everything running:
- Server:
- node server.js -l
- Client:
- chromium-browser
- navigate to the URL: http://localhost/display.html?clientID=0
- Interface
- from your laptop, access the SAGE2 server
- something like:
- Drag/drop some content (PDF, images, …)
- Remember, that videos and WebGL-based application will not work
- Enjoy!